Pollinator gardens look effortless when they mature, a steady hum of wings over swaying flowers and dappled foliage. Getting there takes planning, patience, and a clear understanding of how bees, butterflies, moths, beetles, and birds use space. With a thoughtful design and consistent landscape maintenance services, you can build a garden that pulls its weight ecologically while elevating curb appeal. I’ve led crews through small front-yard conversions and multi-acre meadow installations, and the most successful projects share the same backbone: good site analysis, clean soil preparation, regionally appropriate plant palettes, and smart sequencing of work. Here is how to approach it like a pro.
Start with the site you actually have
Every landscape design begins with truth telling. Walk the property on a sunny morning and again late in the day. Note how light shifts, where wind funnels, and how water moves after rain. A pollinator garden can thrive in six hours of sun, but you can also build a strong shade palette if you only get dappled light under oaks. I carry a soil probe and a small pH kit, though a lab test is worth the modest fee if you are unsure about nutrient levels or contamination. Compaction is common next to driveways and along builder-grade lawns. If your spade stops at two inches, you’ll need aeration and organic matter before anything roots well.
Proximity matters. Locate pollinator plantings within 50 to 100 feet of nesting or resting habitat if you can. Ground-nesting native bees prefer undisturbed, bare or sparsely vegetated patches. Mason bees use cavity nests in standing stems or purpose-built houses. Butterflies need both nectar and larval host plants, and those hosts are often chewed to bits by design. You want that action near eye level, not hidden behind a shed. If you hire a landscaping company, walk them through these observations. A good landscaping service will push back on wish lists that don’t match the site, then offer alternatives that do.
Align goals with maintenance reality
Pollinator gardens run on consistency. The plants you choose and the way you arrange them should match the time and budget you can commit to landscape maintenance services. A 2,000-square-foot meadow mix looks magical in August but will test your patience from March to July with seedlings that resemble weeds. A 300-square-foot border with larger, nursery-grown perennials costs more up front but offers immediate structure and simpler weed control. There is no single right answer, only trade-offs. Be honest about who will do the work, what your lawn care routines look like now, and whether irrigation is feasible during establishment.
I ask clients to envision year three. By that point, the garden should be mostly self-covering, with plants shading out many weeds and soil life stabilized. The route to year three is the challenge. If weekly attention is realistic, you can tackle tighter plant spacing and more complex layers. If not, keep the design simpler with broad drifts of tough species and generous mulch at the start. Professional landscape design services help here by building in maintenance pathways, edging choices, and irrigation zones that save hours down the road.
Map the spaces: nectar, host, water, and shelter
Pollinators need food spring through fall, water in small servings, and safe places to rest and nest. I sketch gardens in zones.
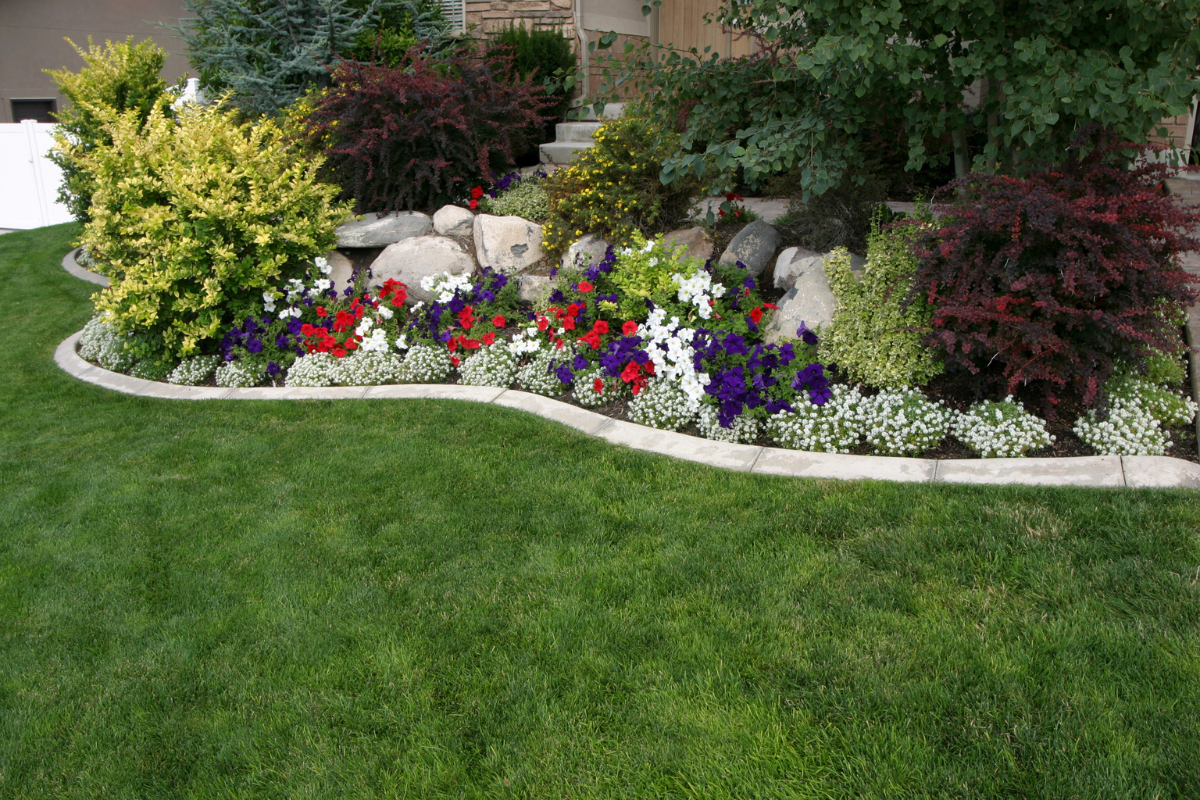
Near the entry walk, I like a nectar-heavy border with staggered bloom times. Early in the season, aim for natives like columbine, golden alexanders, and serviceberry. Summer should lean on bee magnets such as bee balm, mountain mint, and coneflower. Fall carries the baton with asters and goldenrods, two families that do more ecological lifting than their modest looks suggest. If you work with a landscaping company, ask for a planting schedule that ensures at least three species in bloom each month of your active season.
Host plants are the second layer. Monarchs need milkweed, but each region has milkweed species that behave differently. Common milkweed can run in loose soil, swamp milkweed thrives in wetter spots, and butterfly weed loves lean, dry sites. Spicebush swallowtails require spicebush or sassafras. Black swallowtails lay on fennel, dill, and parsley, which can tuck into the herb bed. I prefer to place host plants slightly off the main view to accept the chewing gracefully, or to intermix them with sturdier foliage that hides the damage.
Water features for pollinators should be shallow and stable. A saucer with pebbles filled to just kiss the stones works; so does a drip on a flat rock. Birdbaths are too deep for most insects, though they help with broader garden life. For shelter, nothing beats restraint in fall cleanup. Standing stems left at 12 to 18 inches can house cavity nesters. A brush pile tucked behind a hydrangea hedge offers bumblebees and beneficial beetles a winter home. Your landscape maintenance plan should formalize this approach. Ask your crew to leave designated habitat zones intact until late spring, and to cut other areas at varied heights rather than scalping everything.
Soil preparation, the unglamorous backbone
Most pollinator plants are adapted to leaner soils than we give them. Overly rich beds push floppy growth and short-lived perennials. The goal is friable soil with good drainage and enough organic matter to support microbial life, not a vegetable-garden loam. On new builds or compacted lawns, we typically strip turf, broadfork or deep-tine to break compaction, then topdress with 1 to 2 inches of compost. Incorporation depth depends on existing texture. On sand, blend the top 6 inches to coordinate moisture; on clay, avoid deep tillage that can smear layers and create a perched water table.
Solarization can help suppress a weedy seed bank ahead of planting. It takes four to eight weeks under clear plastic during warm months. Herbicide has a place in limited circumstances, like eradicating a patch of invasive knotweed or quackgrass before planting. If you prefer to avoid it, plan extra time for hand removal and expect a heavier mulch layer in the first year. Edge definition is more important than most people think. A clean steel edging, a spade-cut edge, or a small curb keeps lawn creep and mulch drift in check. This single detail can halve your future weeding load.
Pick plants with your region, not a catalog, in mind
A sturdy pollinator palette starts with native species adapted to your ecoregion. That does not mean every plant must be native, but the backbone should be. Work with a nursery that uses local ecotypes when possible, or at least species-level natives rather than heavily altered cultivars that trade nectar for fashion. Some straight species stand taller or seed more than a city lot can handle. In those cases, well-chosen selections can fit the scale while maintaining ecological value. The nuance is real. I have no issue using Calamintha nepeta in a hot, dry strip next to a driveway, even though it is not native, because it feeds bees for months without becoming invasive.
For full sun, the combinations are abundant. Pair warm-season grasses like little bluestem or prairie dropseed with perennials that carry color and nectar. Mountain mint draws such a dense halo of pollinators that crews learn to give it space in midsummer. Coneflower and black-eyed Susan provide structure, with asters and goldenrods extending the season when bees are building winter reserves. In partial shade, think spring ephemerals and summer woodland edge species: foamflower, wild geranium, Solomon’s seal, and great blue lobelia. In deep shade, focus on foliage and tolerate a lighter pollinator show, then compensate by adding early-blooming shrubs at the margins.
Shrubs and small trees determine the garden’s character. Serviceberry blooms early and feeds both bees and birds. Ninebark offers structure and good spring nectar. Buttonbush becomes a spherical bee airport in July, but it needs moisture. If you have room for one tree with real community value, a native oak supports more caterpillars than almost any other genus in North America. When clients ask about immediate impact, I’ll include a few larger container sizes for the key shrubs, then backfill with smaller perennials that grow in.
Design for bloom succession and legibility
Pollinator gardens can devolve into a tangle if you don’t give the eye places to rest. I rely on repetition and rhythmic drift. Repeat two or three anchor plants down the length of a border so the composition holds together. Use taller plants in purposeful clumps instead of one-of-everything scattered evenly. Aim for bloom succession in layers: early spring shrubs and bulbs, mid-spring perennials, summer workhorses, late-season powerhouses, and winter seedheads.
Paths change behavior as much as plant choice. A narrow mulch path that meanders through the bed invites close observation and slows mowing blowback from adjacent lawn care. A stepping stone path signals structure and helps crews move without crushing seedlings. Where the garden meets turf, consider a crisp line at least 4 inches deep to deter grass rhizomes. For a contemporary look, a metal edge paired with a fine gravel apron creates a clean, intentional transition that neighbors and HOA boards appreciate.
Installation sequencing that saves money and headaches
I schedule pollinator garden installs in three waves when possible. First, hardscape and edges. Get paths, stone, and steel set before plants arrive. Second, large woodies. Trees and shrubs go in while equipment access is still easy. Third, perennials and plugs, followed by seed in designated pockets if part of the plan. Irrigation lines and drip emitters should be test-run before planting finishes. A simple, battery-timer hose bib system can carry a small garden through its first two summers without a full irrigation install.
Mulch is a tool, not a goal. For container-grown perennials, a 2-inch layer of shredded hardwood or leaf mold suppresses weeds and buffers moisture in year one. In dense perennial plantings, that mulch can be a temporary scaffold that disappears as the canopy closes. In seeded areas, skip thick mulch that blocks germination. If you need a visual tidy-up, use a light straw cover or hydromulch appropriate for native seed.
Maintenance that favors life, not just neatness
The first growing season is about root establishment and weed suppression. Water deeply and less often to train roots down. Pull or cut weeds before they set seed, and learn the look of your young perennials so you don’t yank the wrong plants. Landscape maintenance services can be customized for this period: biweekly visits from May through July, then monthly check-ins through October. Crews who understand the difference between a coneflower rosette and a thistle seedling pay for themselves in saved plants.
Year two shifts to selective editing. Some species will surge. Others will sulk or move a few feet to find a better microclimate. Thin bullies, divide clumps to fill gaps, and adjust irrigation if necessary. Start leaving stems in fall. A practical rule I give teams is to cut a third of the garden to 18 inches, leave a third standing, and lay a third of the stems down between plants as light mulch. That patchwork keeps the garden tidy enough for suburban expectations while protecting habitat. By year three, mulch use should be minimal because plant density does the work.
Avoid broad-spectrum insecticides around a pollinator garden. If a pest crosses a threshold, spot treat with targeted methods and accept minor cosmetic damage as part of a living landscape. Fertilizer is rarely necessary after establishment unless a soil test shows a deficiency. Overfeeding creates floppy growth that topples in storms and invites aphids. Pruning shrubs on a schedule that respects bloom time matters. Spring https://caidentkfn975.iamarrows.com/all-season-landscape-maintenance-services-plan bloomers set buds the previous season, so prune right after flowering. Summer bloomers can be cut in late winter.
Working with a landscaping company the smart way
Not every firm approaches garden landscaping with ecological goals in mind. When interviewing providers, ask to see two projects at least two years old. New installations always look fresh. Longevity shows craft. Listen for how they talk about soil, plant provenance, and maintenance. A team that offers landscape design services and in-house maintenance has an easier time closing the loop between intention and daily care. If design and maintenance are separate, insist on a written handoff: a plant list with bloom times, cutback notes, irrigation schedules, and habitat protocols.
Clarify expectations around lawn care near the garden. String trimmers and blowers can strip bark and shred seedlings. Set no-mow buffers, encourage blade-sharpness for clean cuts, and consider raising mower height to three and a half inches or higher to support clover and reduce stress in adjacent turf. Ask your landscaper to switch to battery tools where possible to cut emissions and noise, which matters when you are encouraging birds and beneficial insects to settle in.
Scaling up with seed and meadow techniques
For larger areas, plugs in the hundreds or seed in the pounds bring costs down. Seeding shines in sunny, open sites with good preparation. The first year looks unimpressive, the second starts to hint, the third pays off. Patience is built into the model. I often combine strategies: plug structural species like little bluestem, rudbeckia, and monarda at 18-inch spacing, then broadcast a diverse native seed mix around them. The plugs break up weed pressure and offer immediate nectar while the seed cohort germinates and sorts itself.
Burns, mowing, or timed cutbacks maintain meadows depending on your region and rules. Where burning is not allowed, an early spring mow to eight inches can mimic some disturbance benefits. The key is to avoid mowing during peak bloom and to watch for ground-nesting bee activity before scheduling any large maintenance pass. A professional landscaping service with ecological meadow experience can guide timing so you reset succession without gutting habitat.
Navigating HOAs and city regulations
Pollinator gardens sometimes trigger complaints from neighbors who equate short and clipped with responsible. Design for legibility. A low fence, a crisp edge, and a sign that explains the purpose do wonders. Keep lines of sight clear at driveways and sidewalks. Tuck taller plants away from the street. In many municipalities, natural landscape ordinances now recognize managed native plantings, but they expect intentionality. A maintained path and a tidy edge satisfy most observers that the garden is cared for, not abandoned.
If you face a citation, respond with documentation: the plant list, a maintenance calendar, and photos of native bees or butterflies on site. I have sat in front of review boards with a simple message: this is not neglect, it is habitat managed by a professional. In almost every case, clarity wins.
Budgets, timelines, and what success looks like
Costs vary widely. A simple 200-square-foot front border installed with nursery perennials might run the cost of a weekend getaway. A comprehensive quarter-acre conversion with grading, paths, irrigation, shrubs, and hundreds of plugs can match a used car. Spend where it counts. Soil prep and edges give you a return every season. Quality plants beat bargain-bin stress cases. Irrigation saves entire plantings during a hot first summer.
As for timing, the sweet spots for planting are spring after soils warm and early fall while the ground is still workable. Fall planting gives roots time to knit in with less stress, but you must be ready to protect young plants from heaving freeze-thaw cycles in colder zones with a light mulch. Spring planting offers longer establishment but requires more watering vigilance.
Success is not a single photo day. It is a season-spanning sequence: bumblebees nosing into bluebells in April, sweat bees mobbing mountain mint in July, monarch caterpillars making a mess of milkweed in August, and goldfinches working coneflower seedheads in October. It is the slight reduction in runoff after heavy rain because your soil now accepts more water. It is fewer aphid outbreaks because lacewings and hoverflies found a home. And yes, it is the neighbor walking by with a question instead of a complaint.
A simple phased approach for homeowners and pros
- Phase 1, one to two months: site analysis, soil testing, schematic plan, and procurement of plants and materials. Phase 2, one to three weeks: turf removal, edging, path and irrigation install, soil prep. Phase 3, one to two weeks: plant installation, initial watering schedule, light mulch, signage and habitat features. Phase 4, first growing season: biweekly weeding and watering, spot infill where losses occur, document bloom gaps. Phase 5, year two and beyond: selective editing, division, reduced watering, habitat-friendly fall cutbacks, annual review with your landscaper.
Where lawn still fits
You do not need to eliminate lawn to support pollinators. You do need to be intentional. Shrink the footprint to the areas you use and keep it healthy. Taller mowing, sharp blades, and moderated fertilizer reduce stress and improve resilience. If your local rules allow it, let Dutch white clover mingle in the turf to offer nectar between mowings. Buffers between lawn and beds protect both. In my experience, a balanced property has a place to toss a ball, a place to sit in shade, and a place to watch bees at work.
Working examples that prove the model
A small-city front yard, 400 square feet, full sun on clay loam: we replaced turf with a steel-edged, crescent-shaped bed, added two serviceberries, and a matrix of prairie dropseed with drifts of purple coneflower, anise hyssop, and smooth aster. Mountain mint lined the walk. The first summer needed hand watering twice a week. By the second autumn, goldfinches were feeding on coneflower, and the homeowner cut their mowing time in half.
A suburban school courtyard, partial shade with compacted fill: we broadforked, added leaf compost, and focused on woodland natives. Foamflower, wild geranium, and meadow rue carried spring, with blue lobelia and heuchera for summer. We installed shallow pebble trays for water and left stems standing in winter. Students now track the first bumblebee queen each April, and the maintenance crew has a clear calendar for cutbacks and path clearing.
A corporate campus edge, 1.5 acres, hot and windy: we used a hybrid approach. Drifts of little bluestem and switchgrass established a frame. Within that, we seeded a 40-species mix heavy on asters, goldenrods, and coreopsis. The maintenance plan included a spring mow to eight inches, spot weed control, and one prescribed burn in year three with local fire officials. The meadow now carries pollinator activity from May through October and reduces mowing fuel consumption by a measurable margin.
When to call in landscape design services
If your site has drainage issues, invasive species pressure, complicated microclimates, or regulatory hurdles, bring in a professional early. A qualified designer can tailor plant choices to your soils, build a bloom calendar that avoids gaps, and produce documents your maintenance team can follow. Integrating pollinator goals with broader garden landscaping, like patio layouts and screening, keeps the property cohesive. Most problems I get called to fix were cheaper to avoid than to repair, particularly grading errors and irrigation overspray that drowns dry-site species.
The quiet payoffs
Pollinator gardens are not only for bees. They slow stormwater, soften heat around hard surfaces, and pull you outside more often. They give children a reason to squat and look closely, which might be the best outcome of all. From a business perspective, properties with thoughtful ecological planting often need fewer inputs after establishment and experience less pest volatility. From a homeowner’s perspective, the daily pleasure of watching a garden earn its keep is hard to quantify, but it is real.
Partner with a landscaping company that understands both aesthetics and ecology, and hold them to a standard that favors life. Learn a few plants by name, notice who visits them and when, and let that feedback shape your next small change. Start small, or go big if you are ready. Either way, you are not just decorating. You are building habitat that works, one bed, one bloom, one season at a time.
Landscape Improvements Inc
Address: 1880 N Orange Blossom Trl, Orlando, FL 32804
Phone: (407) 426-9798
Website: https://landscapeimprove.com/